Room Light Control
Introduction
Room Light Control is used to automatically manage lighting based on presence detection, natural light levels, and manual triggers. It allows combining multiple sensors and outputs to define how lights behave in different room states, like occupied or unoccupied.
Overview
Let's start with a quick overview of how it works.
A Room Light Control uses inputs, such as occupancy detectors, light sensors, and buttons, to control one or more outputs like groups or channels. Each control can also operate in day mode or night mode, based on a schedule or external trigger. For example, during the day, lighting can be adjusted automatically based on daylight levels. At night, lights can be turned off or only temporarily activated with a manual override.
Each Room Light Control can be assigned multiple occupancy sensors, a light sensor, and multiple outputs like a group or channel.
Parameters
Now we'll go through the parameters that define how the system behaves in each state.
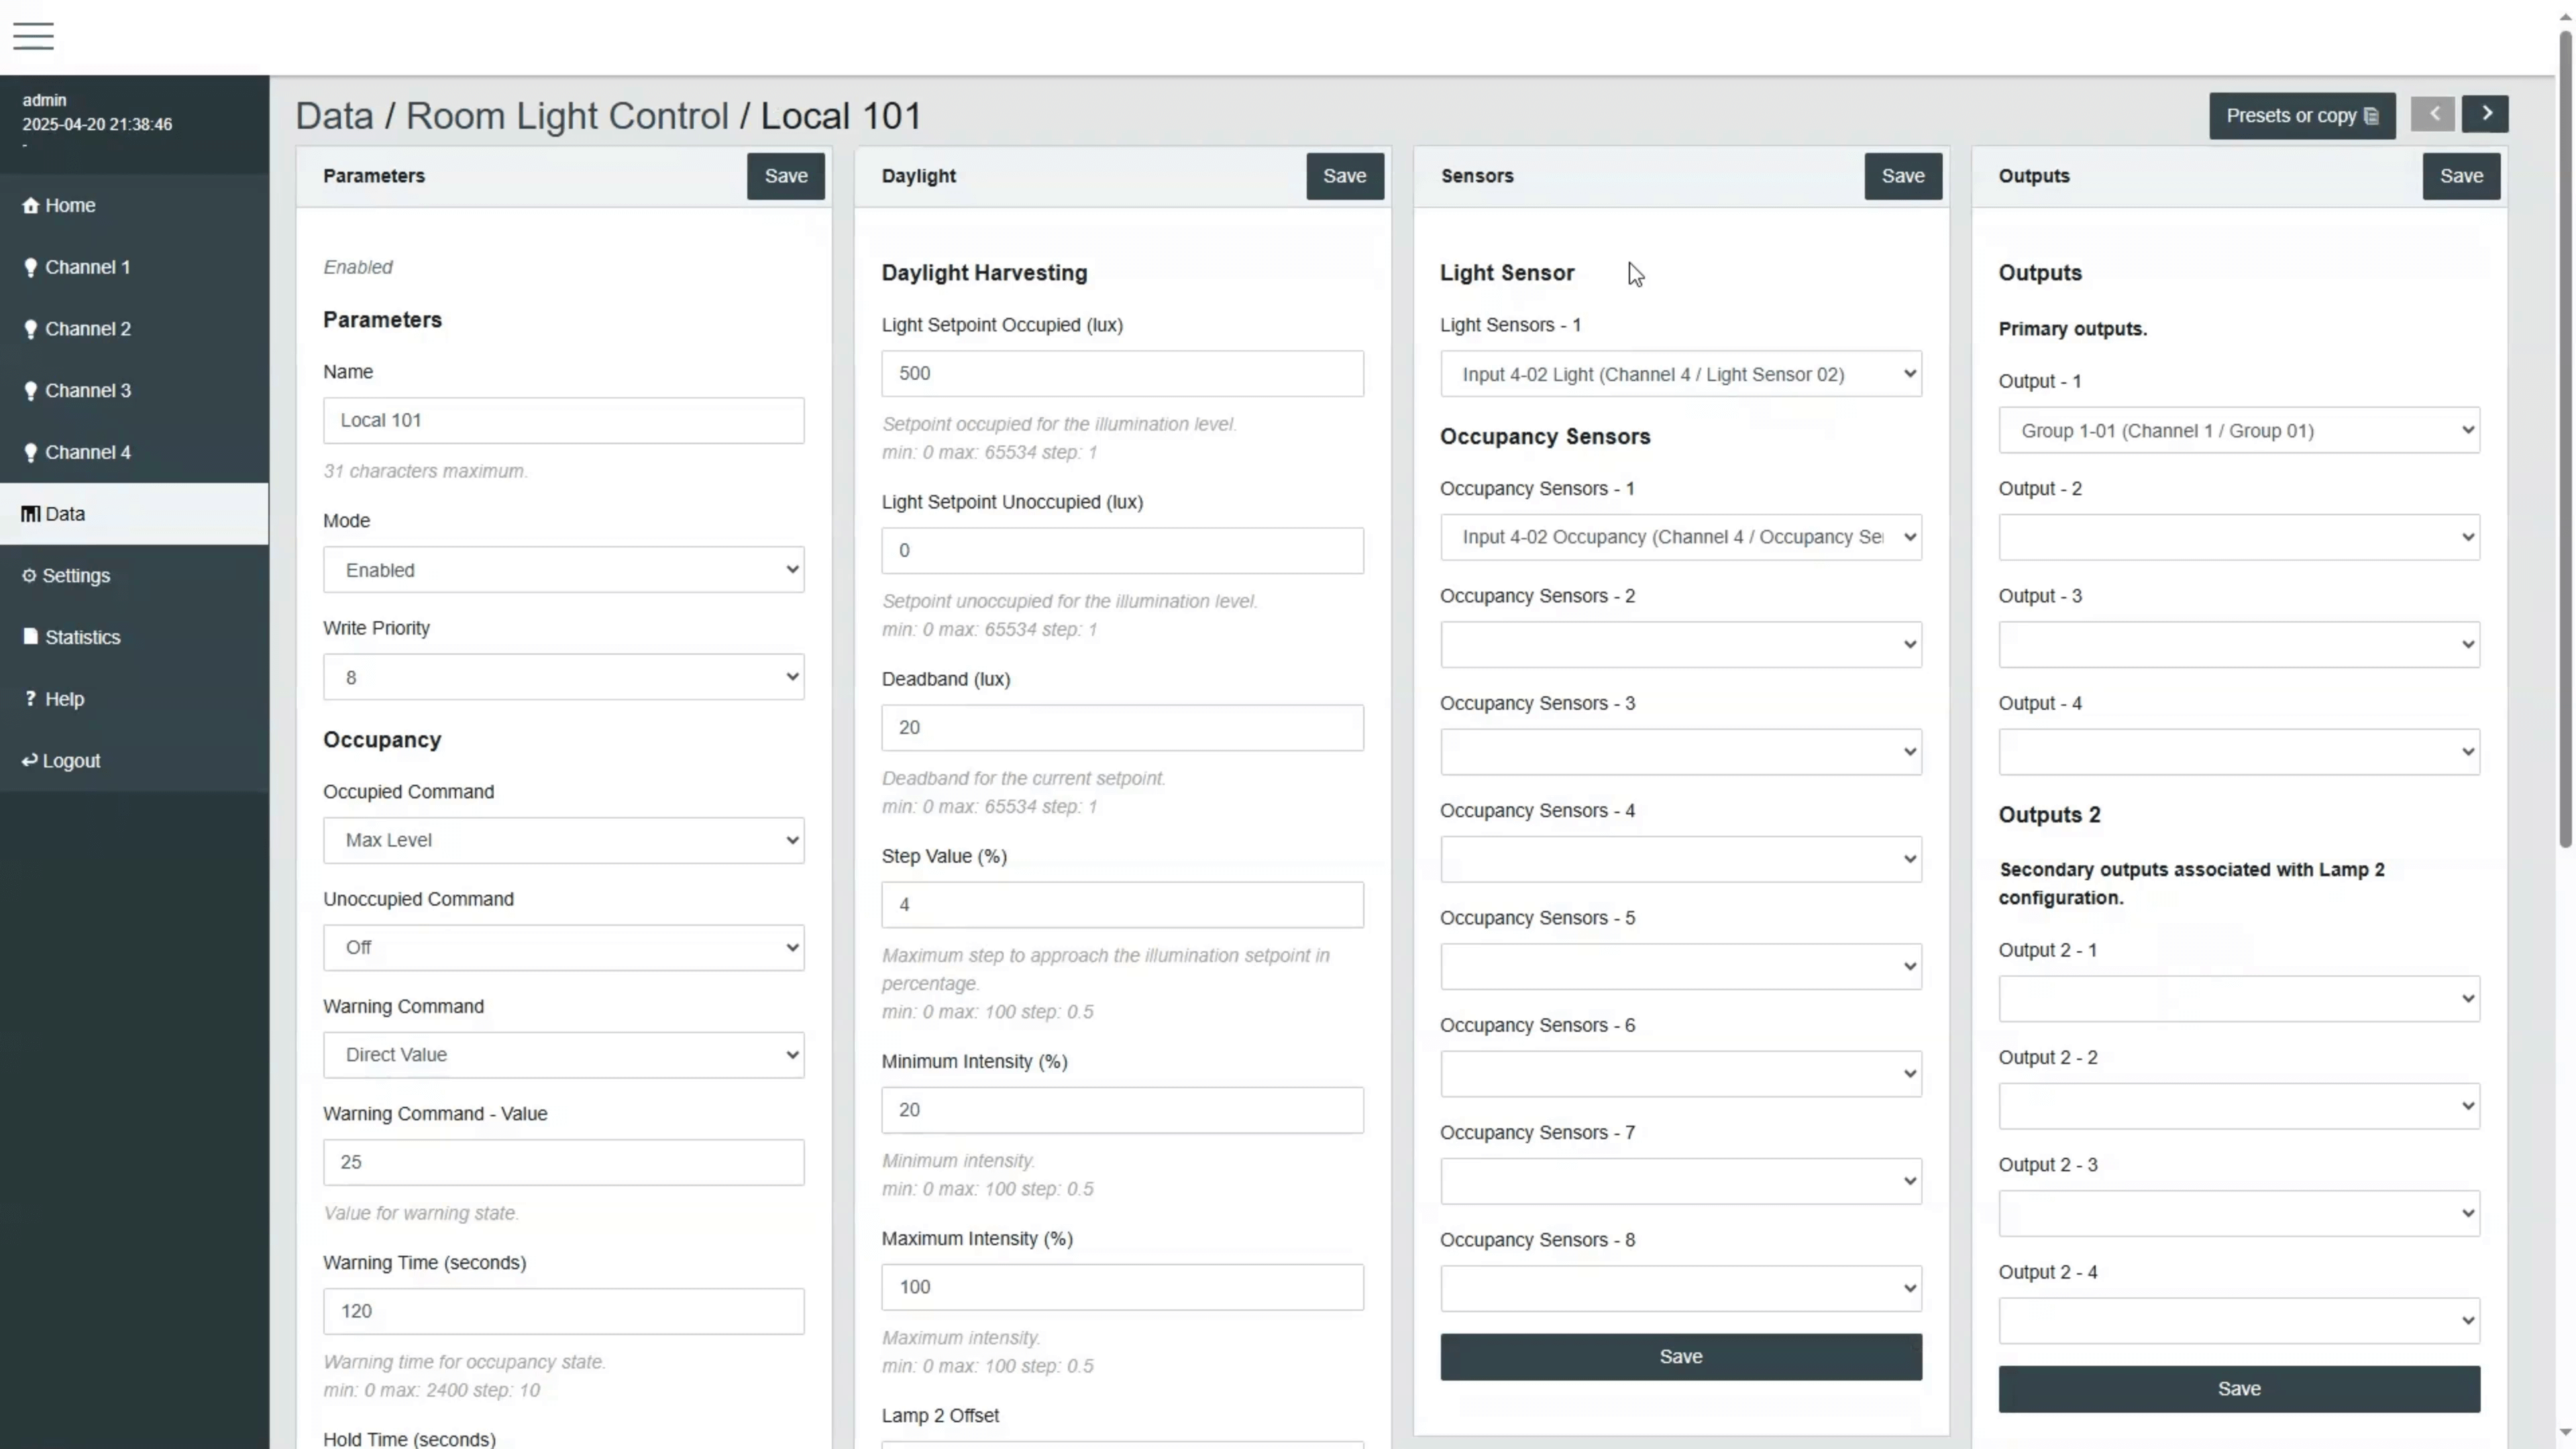
Each Room Light Control has a set of parameters to define how it behaves:
Occupied Command: Defines what happens when someone enters the space, such as turning on to 100% or recalling a lighting scene. It is also possible to configure no command so that lights can be turned on by other means, such as wall switches or a schedule.
Unoccupied Command: What happens when the room becomes vacant, typically turning off the lights.
Warning Command: Briefly dims the lights as a visual warning before turning them off by the Unoccupied Command.
Hold Time: How long the lights stay on after the last detected movement.
Ignore Time: Prevents false triggers just after lights go off.
Override Time: The Override Time keeps the lights on for a defined duration during night mode if someone manually turns them on.
Next, let's look at how the system can adapt lighting based on natural light.
Daylight Harvesting automatically adjusts artificial lighting based on the amount of natural light detected by the sensor. You define a target illumination level, called a setpoint, and the Room Light Control automatically increases or decreases the lighting gradually to maintain it. You can fine-tune the system using the deadband, the adjustment step size, and minimum or maximum output levels.
Schedules
Now let's cover how scheduled behavior can be integrated.
Schedules can control the Occupied Mode of a Room Light Control, switching between day and night behavior automatically.
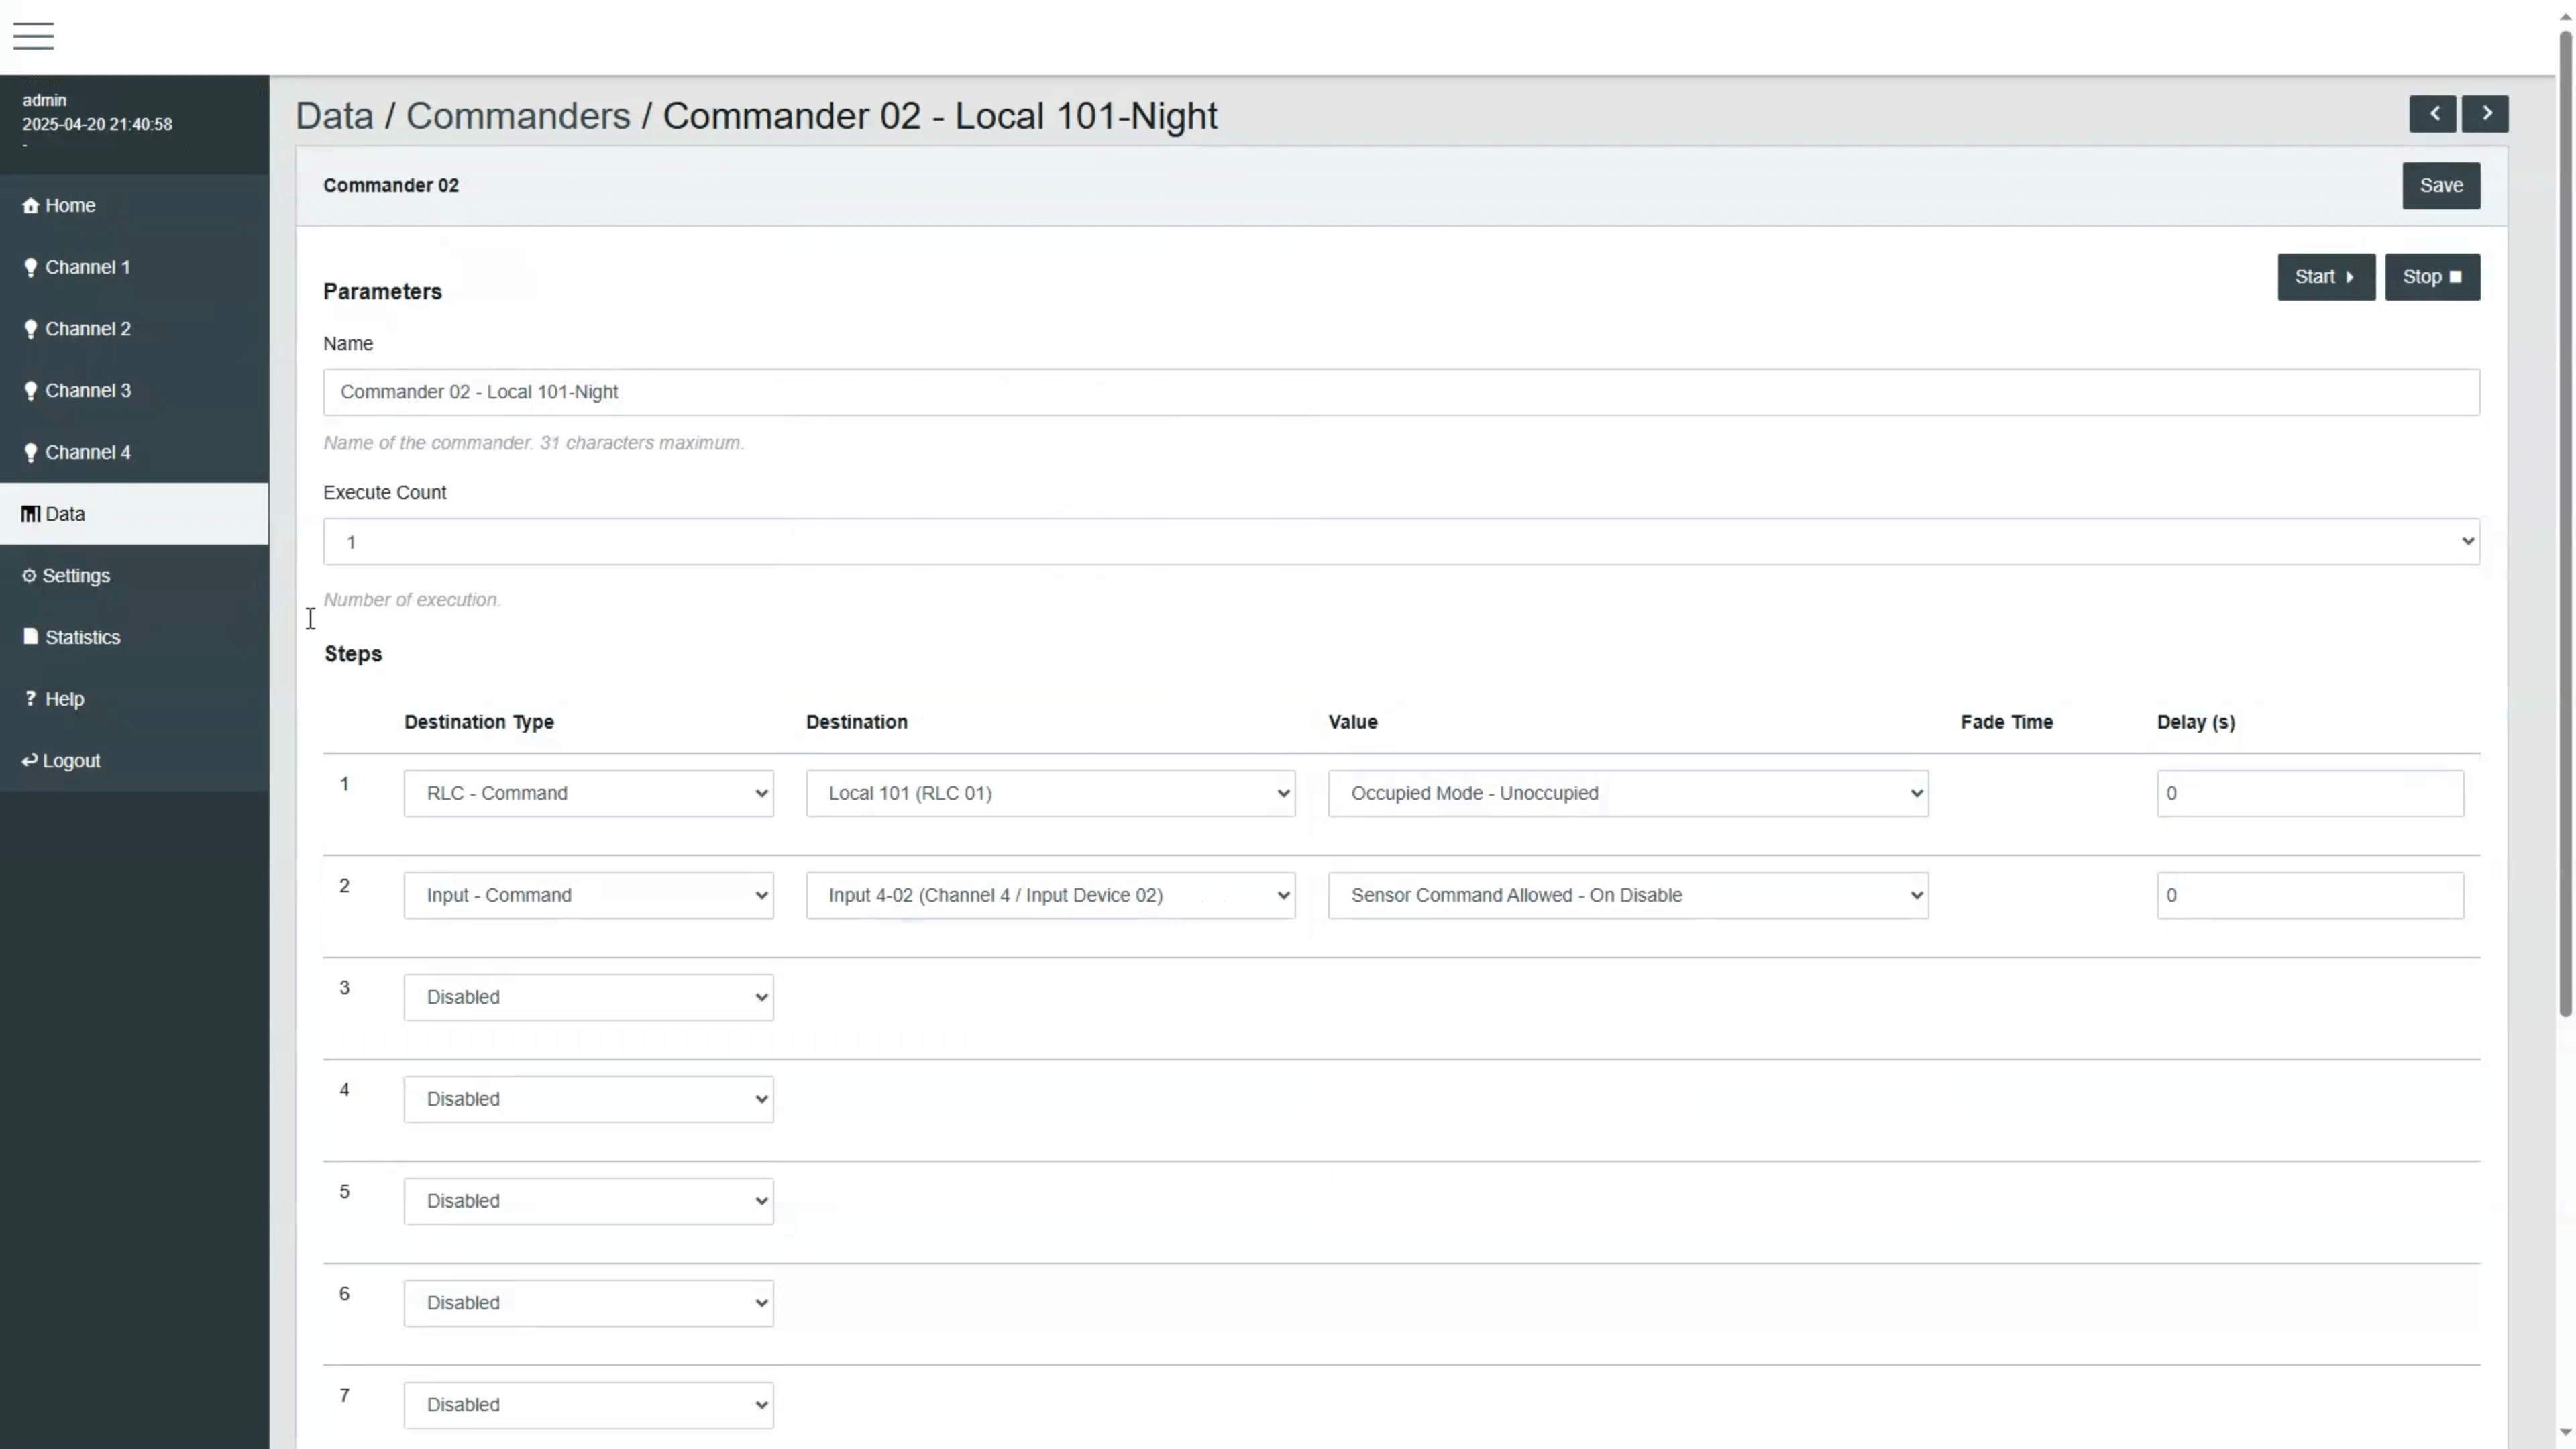
For internal schedules, a Commander can be used as the schedule destination to manage the Occupied Mode (Day / Night Mode) of the Room Light Control.
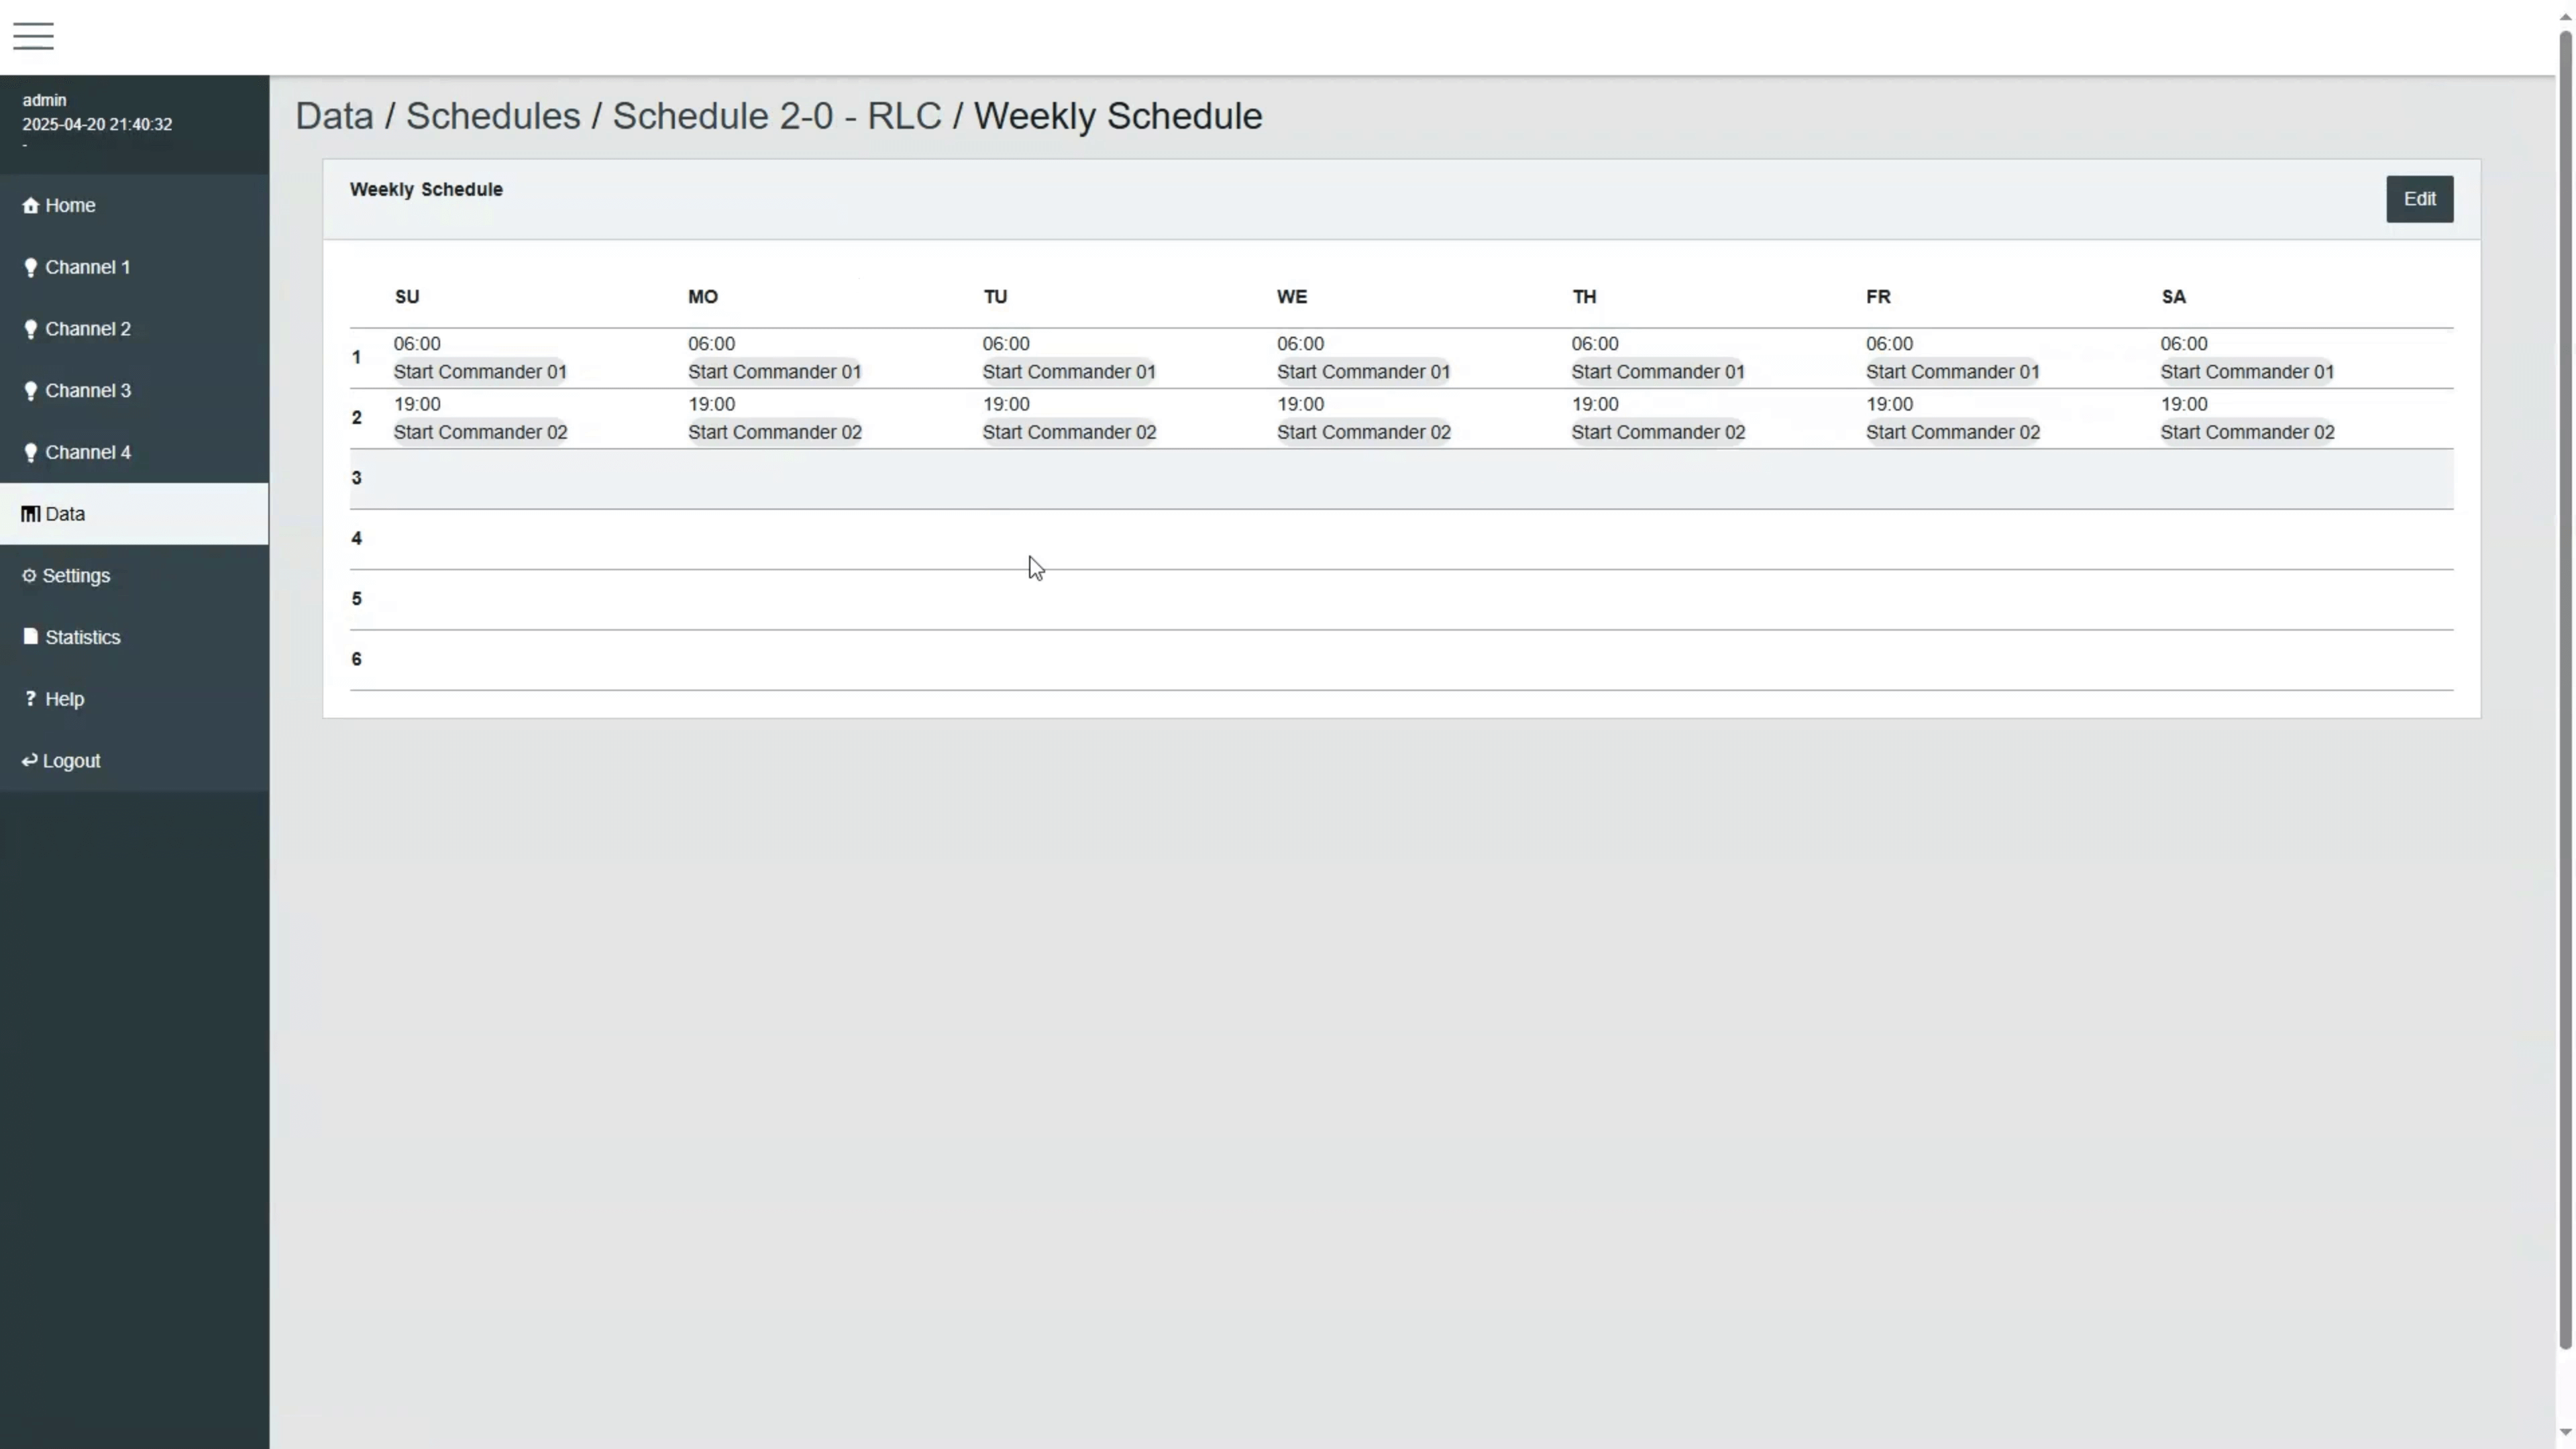
When using an external schedule via BACnet, the Command property of the Room Light Control is used to control the Occupied Mode.
Both approaches allow automating transitions and disabling certain inputs at specific times of day.
Web Interfaces
Let's now look at how to monitor and control the system in real-time.
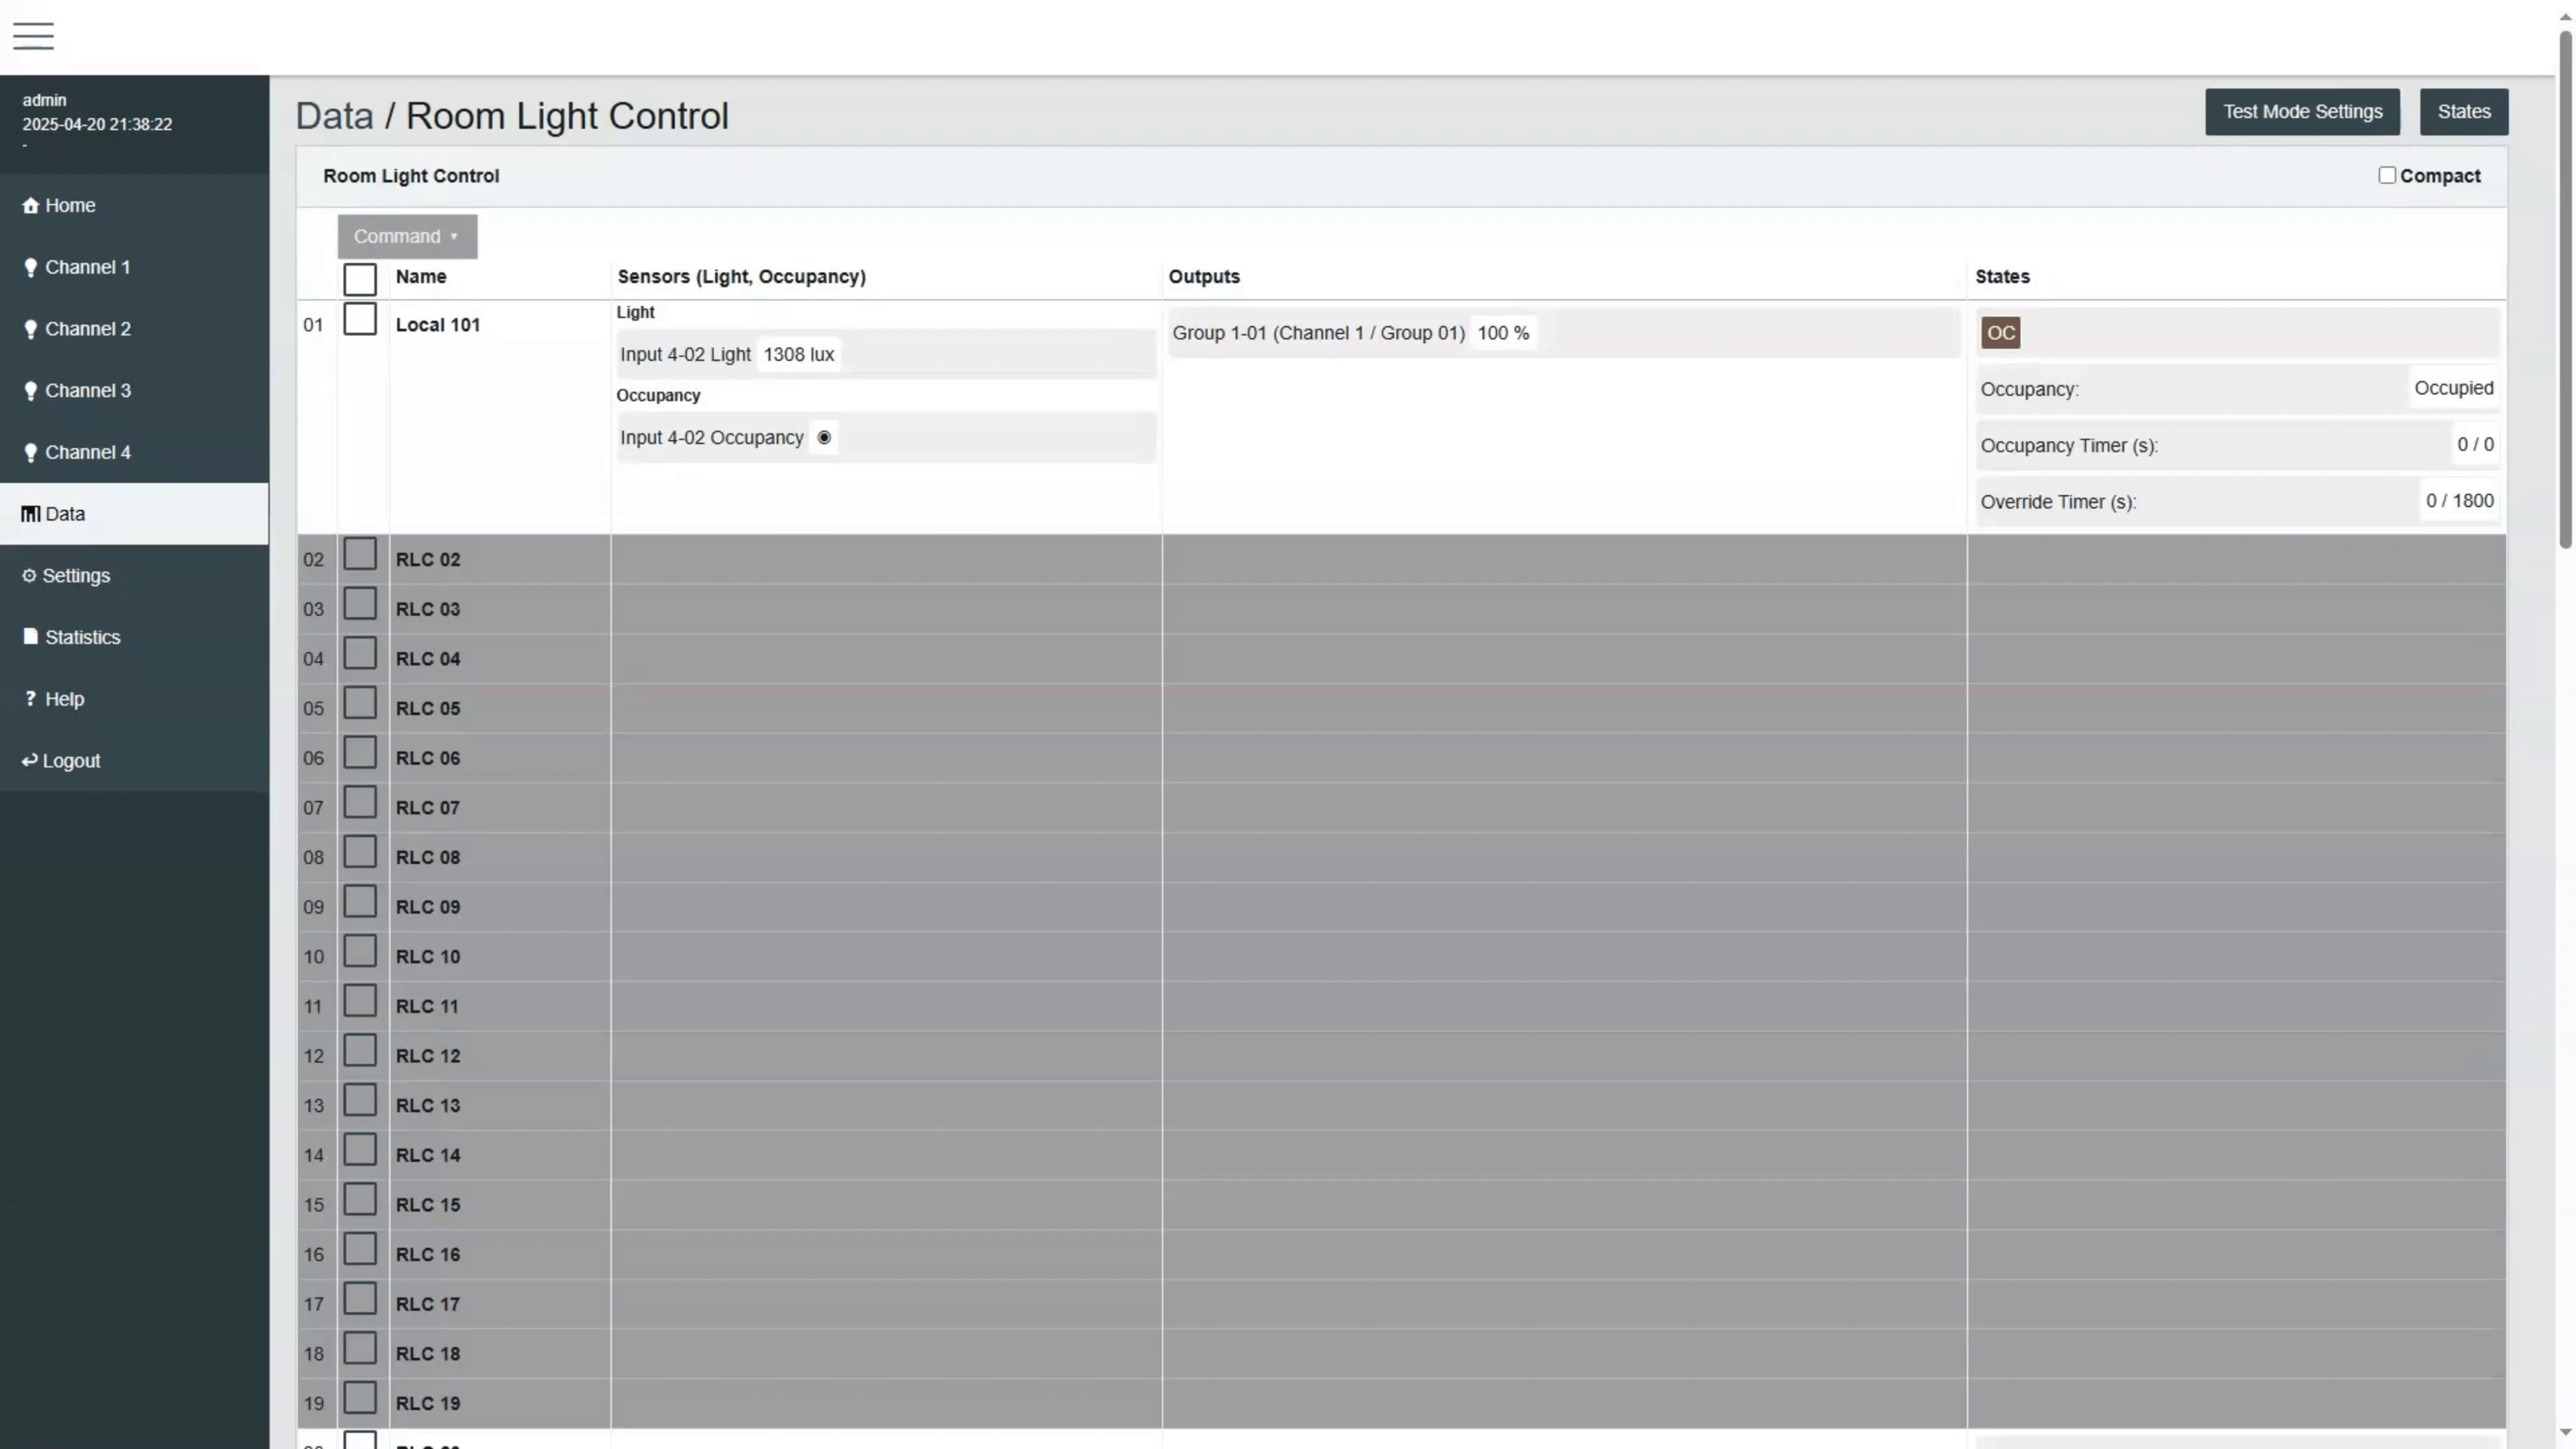
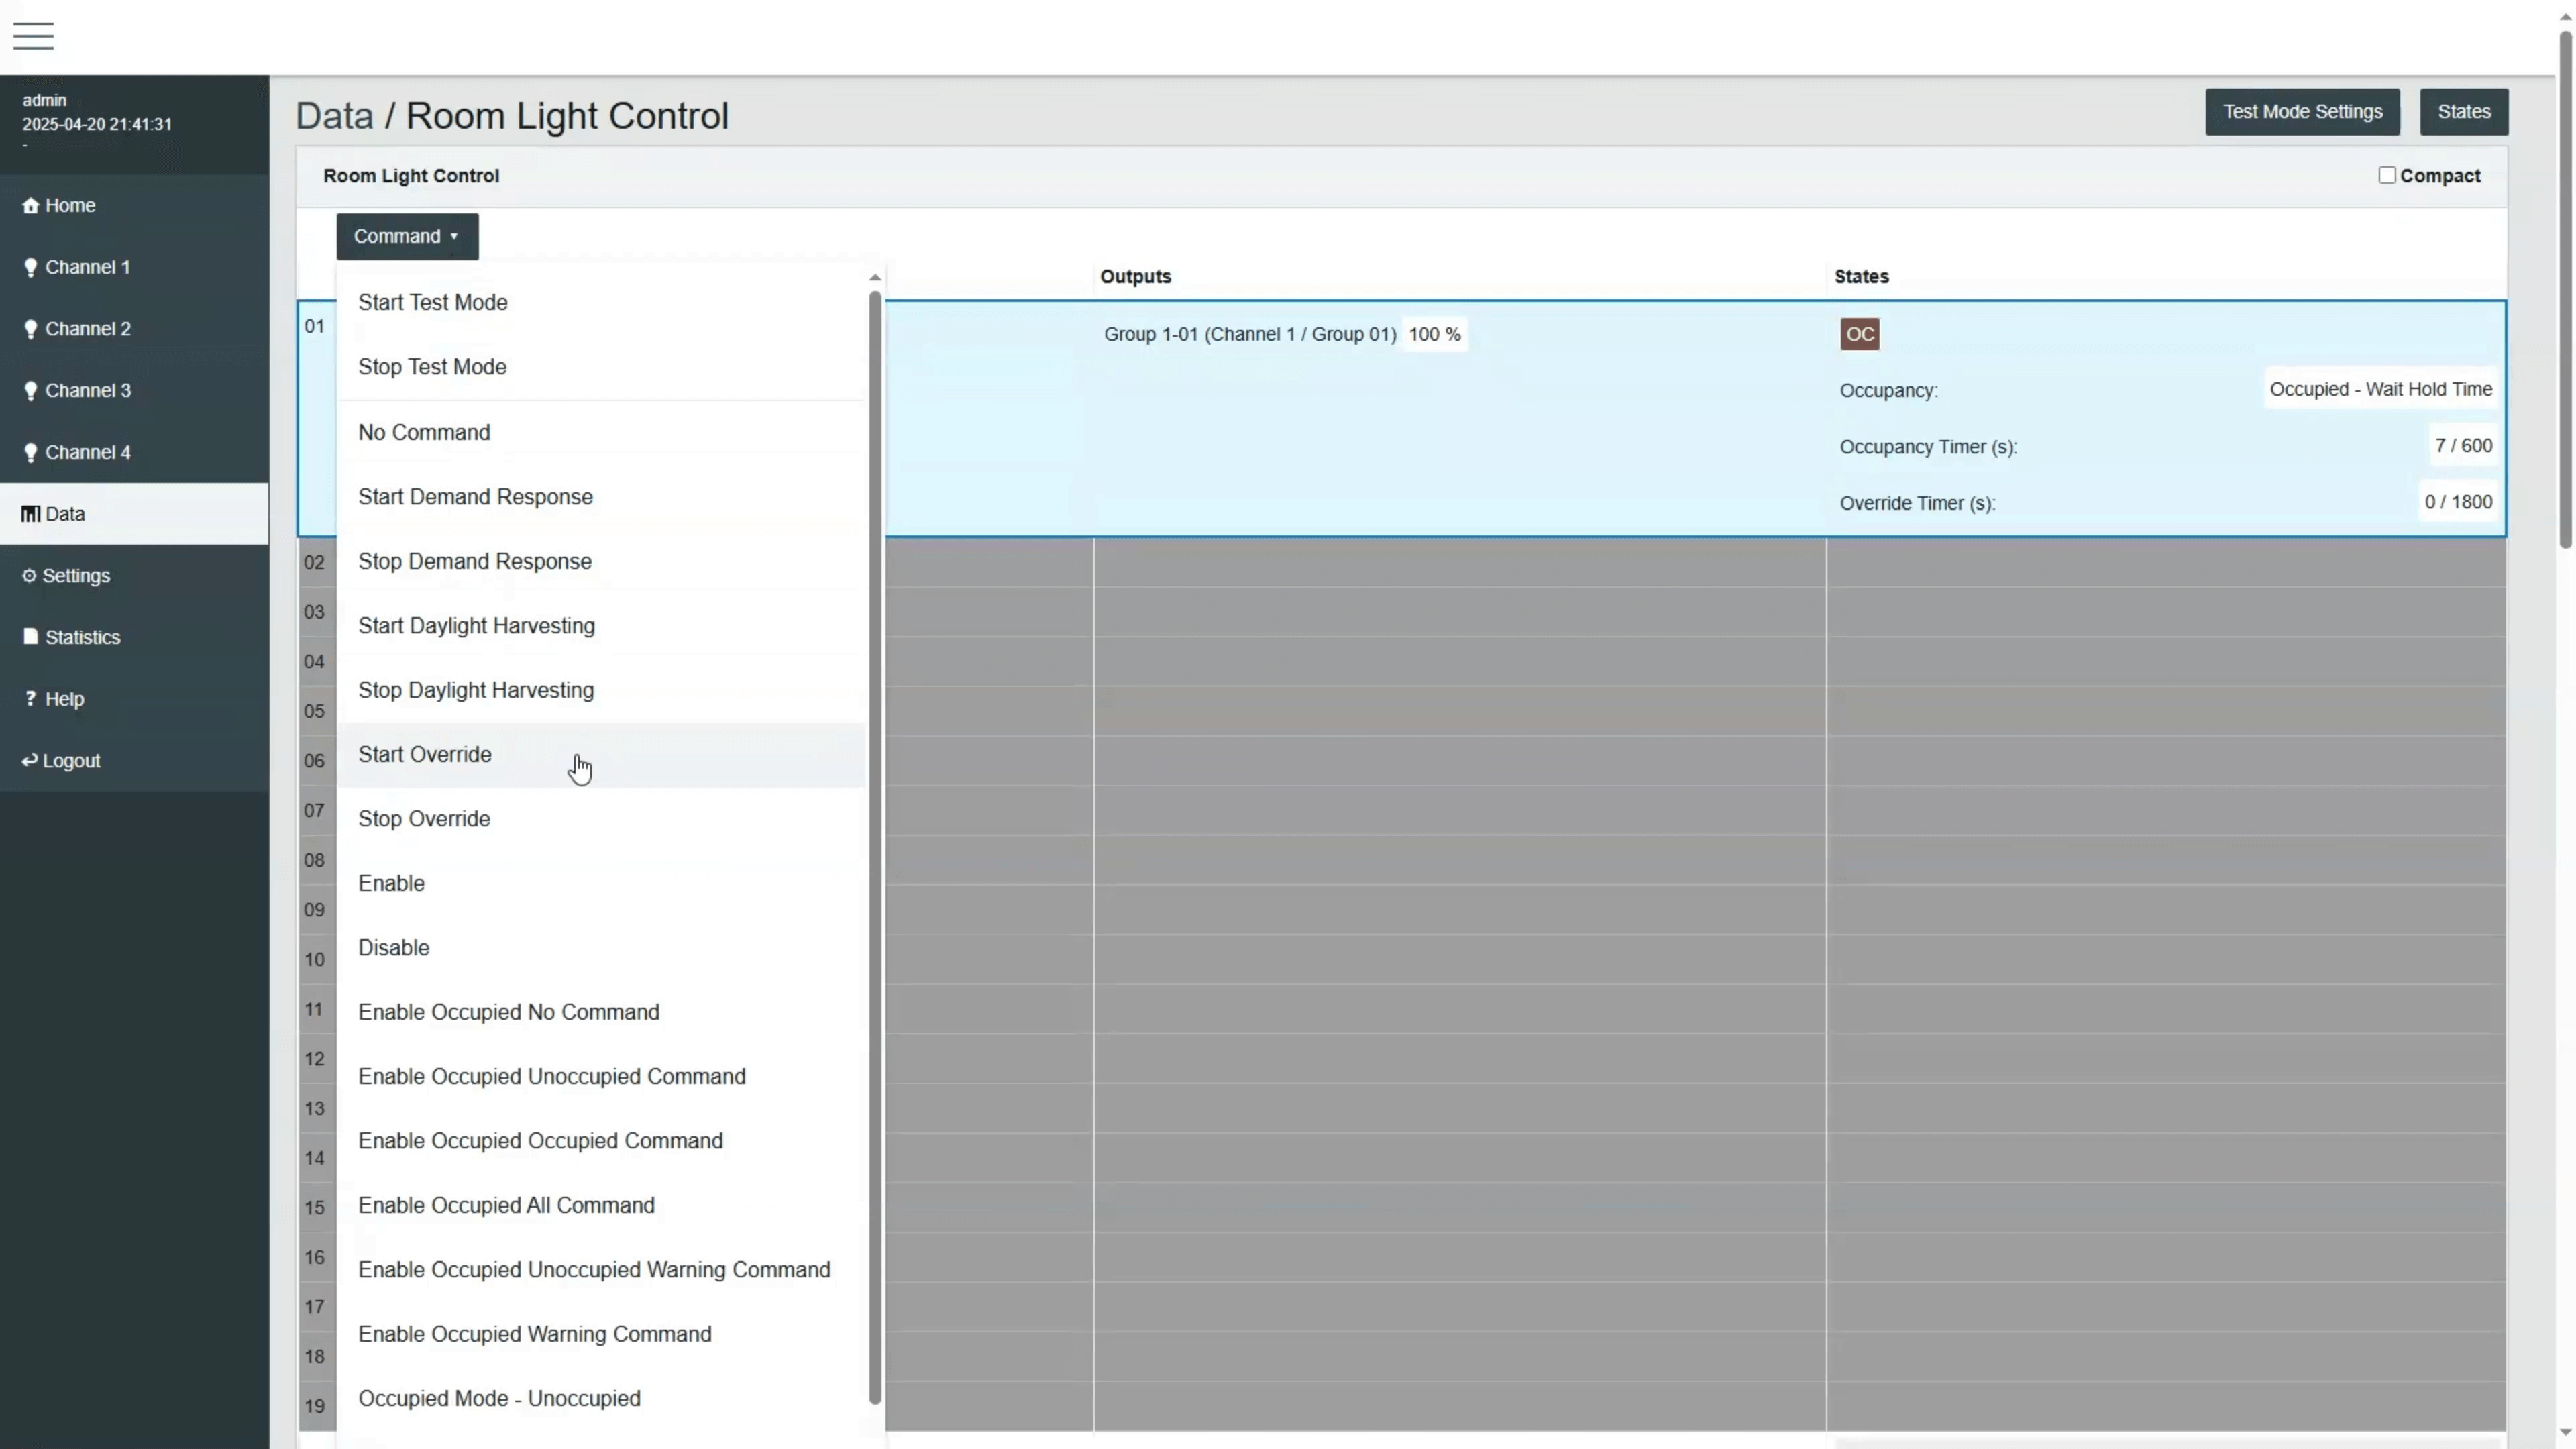
This page lists all available Room Light Controls. It also shows the current states of occupancy, light sensors, and outputs.
It displays real-time feedback from sensors, current output levels, active modes, and timers. This helps confirm that the system is working as expected and allows quick troubleshooting during testing or commissioning.
It also allows manually executing commands for the Room Light Control, such as starting or stopping daylight control, enabling or disabling commands, starting or stopping test mode, and more.
Test Mode
Now let's take a look at the Test Mode for validation and commissioning.
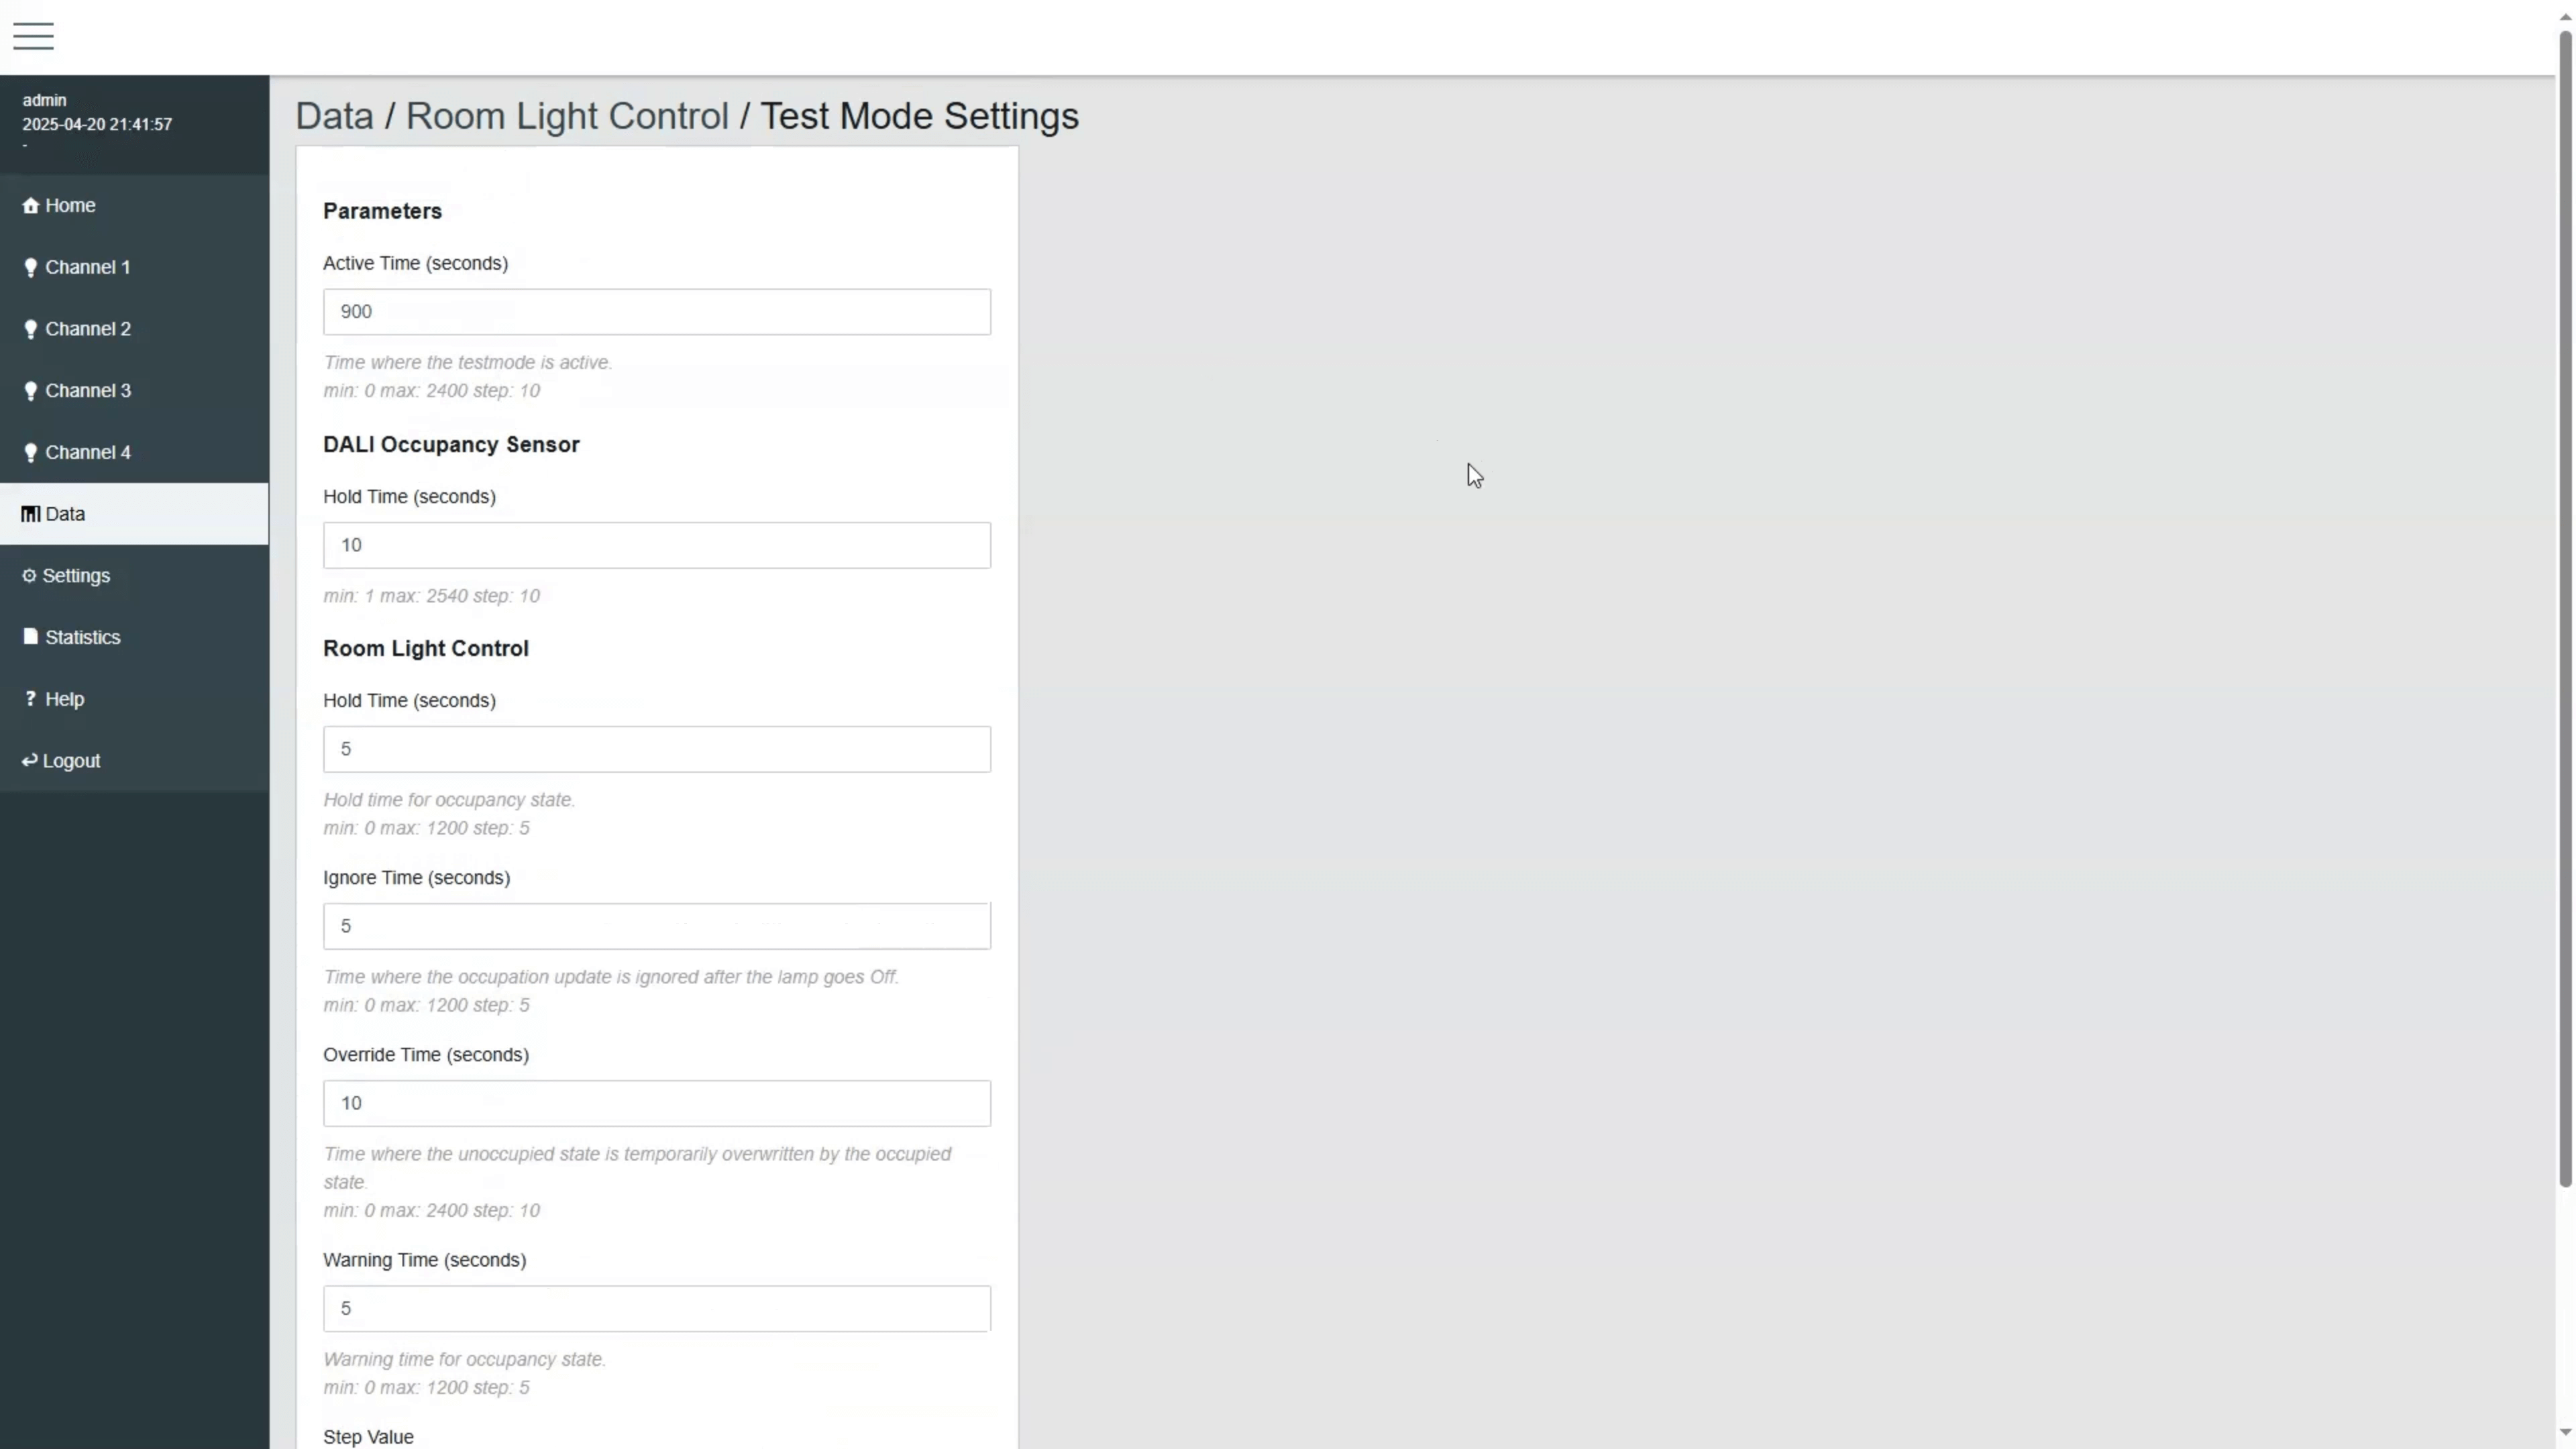
Test Mode is useful for validating that the Room Light Control reacts correctly and confirms that outputs respond accordingly to the desired parameters.
The test mode facilitates quick walk testing. You can also simulate occupancy and button inputs. While this test mode is active, the time delays of the occupancy sensors and Room Light Control are shortened.
After 15 minutes, the test mode automatically deactivates, and the delays of the Room Light Control and sensors return to their normal operating parameters.
Parameters Presets
If you want to save time during setup, presets can help.

Room Light Control includes presets to speed up configuration:
Occupancy Auto: Lights turn on to 100% with presence and turn off automatically when vacant.
Occupancy Auto Partial: Lights turn on to 50% with presence and turn off when unoccupied.
Occupancy Shut Off: Lights only turn off automatically; turning them on must be done manually, for example with a button.
Occupancy Auto Daylight: Starts daylight harvesting when someone enters and turns the lights off when the room is vacant.
Parameters Copy
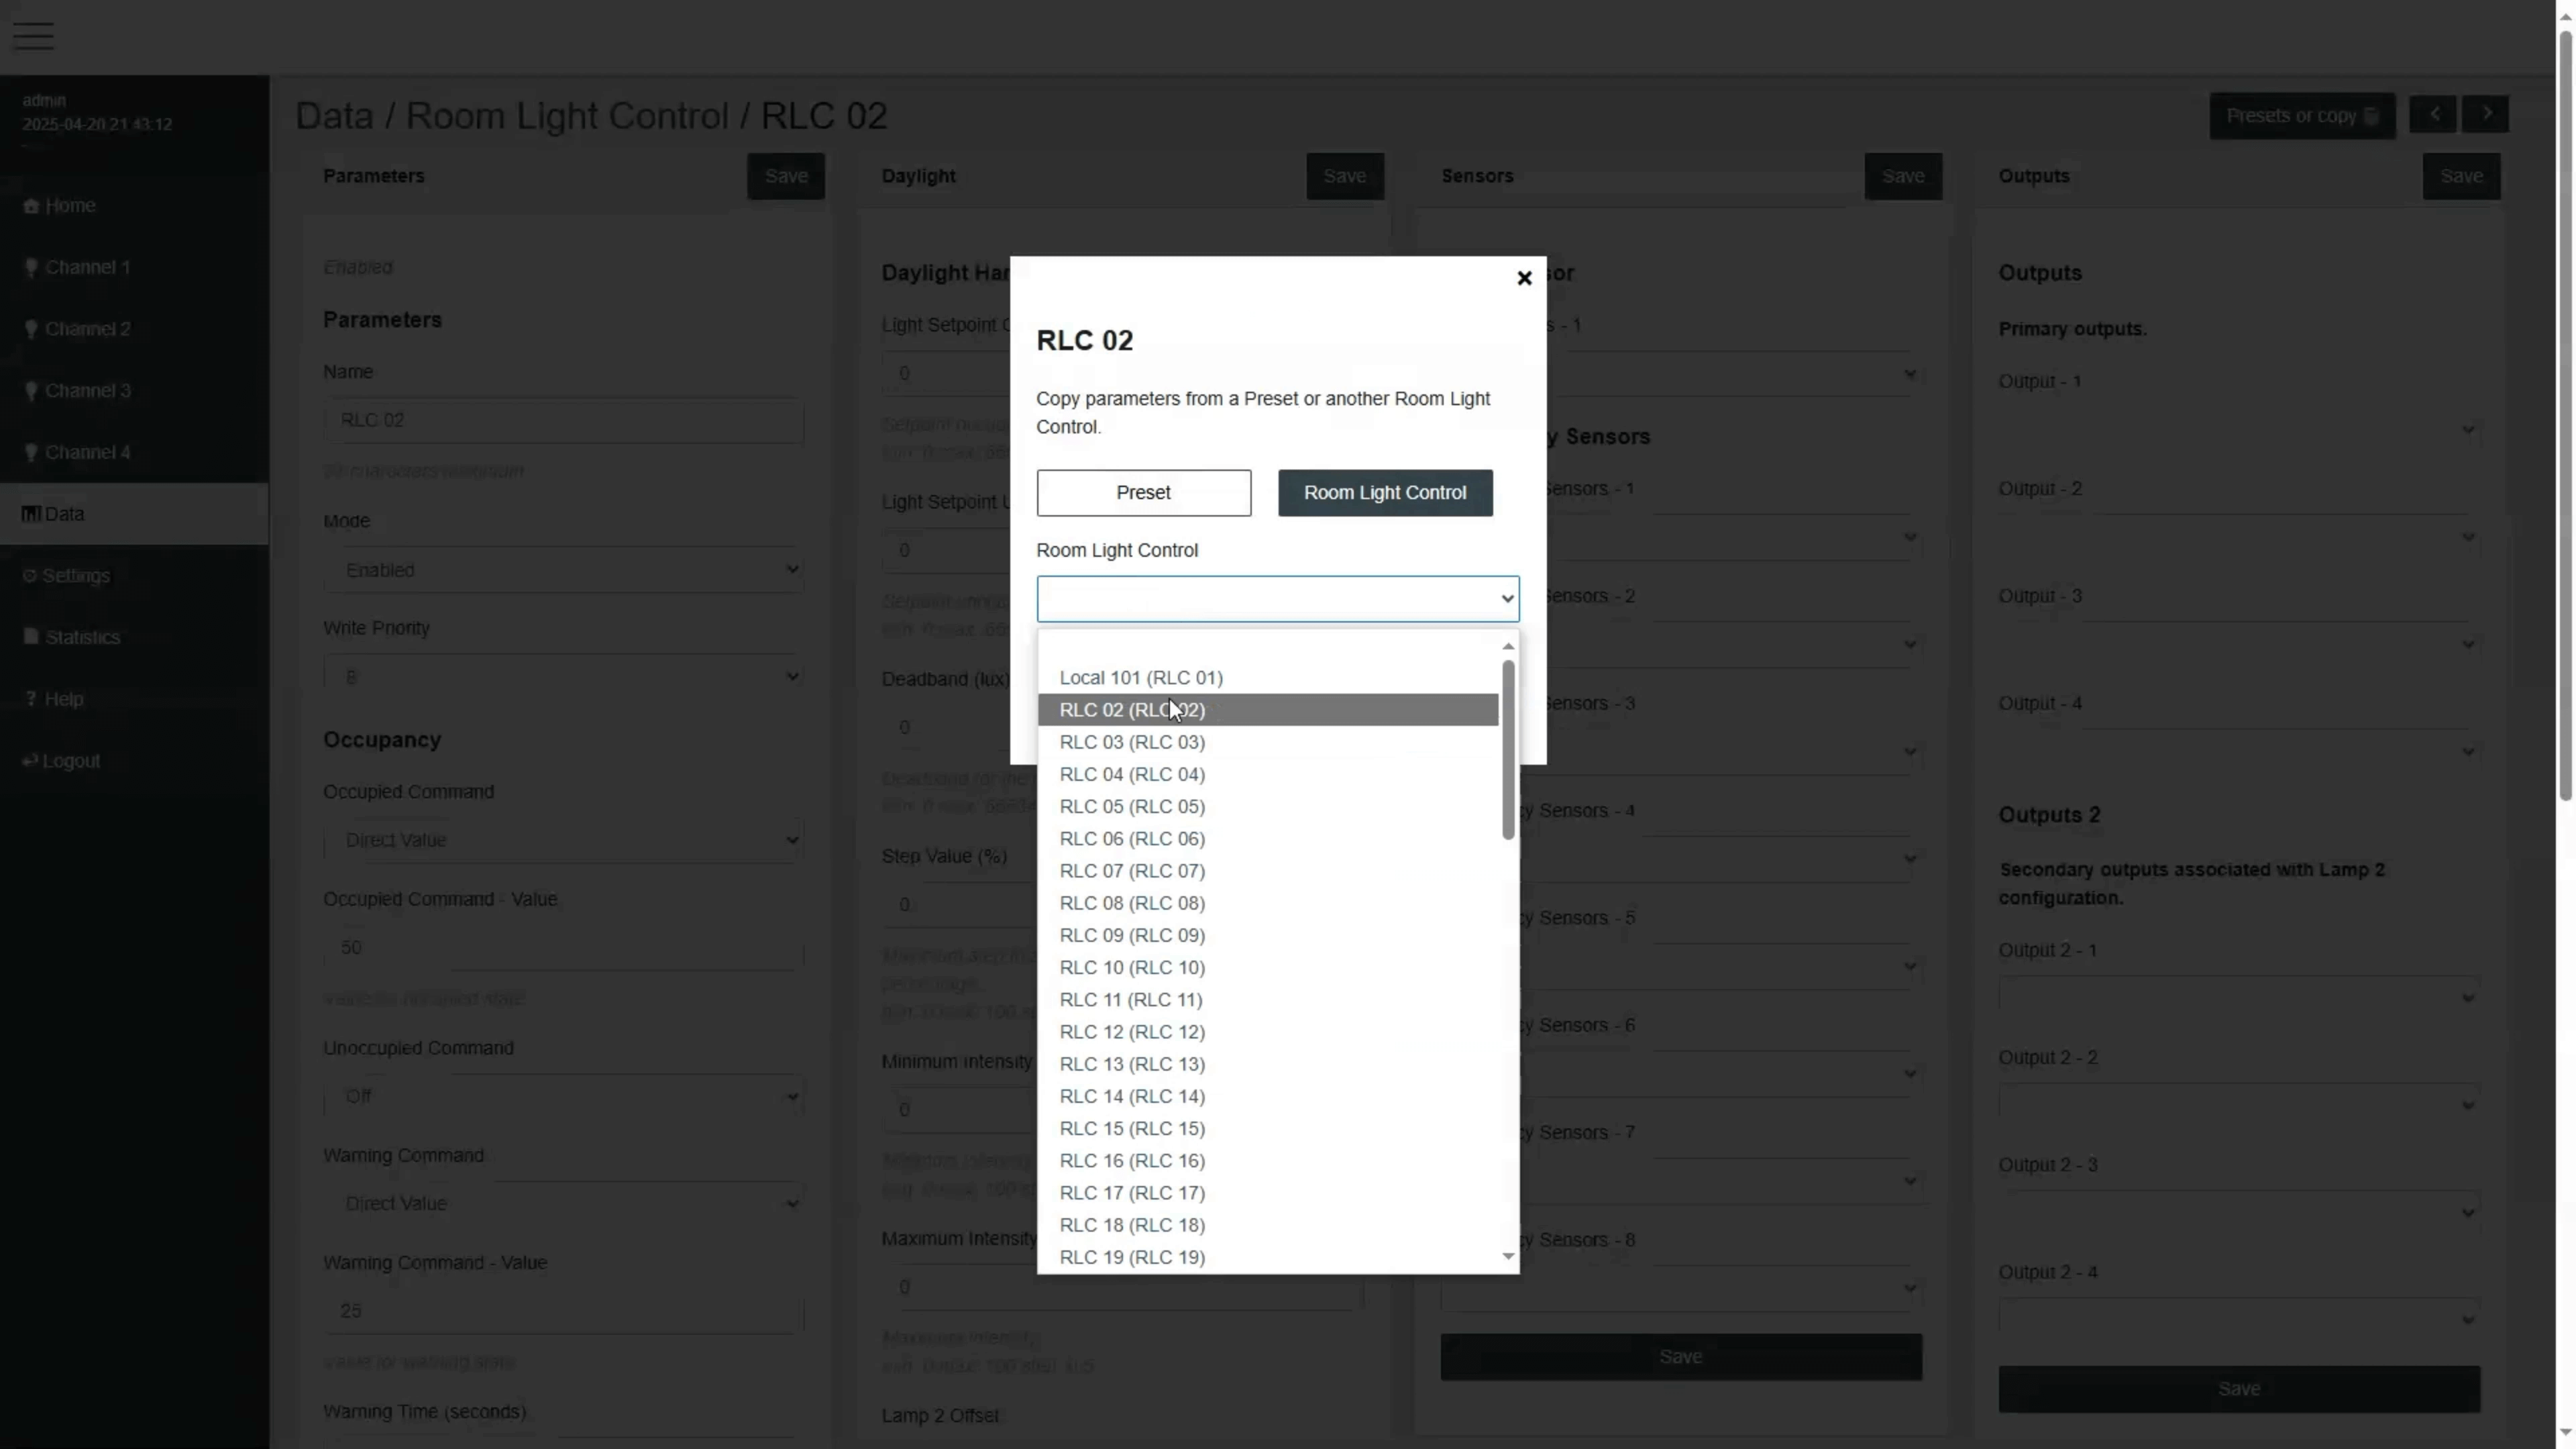
And if you're setting up several rooms with similar settings, copying parameters is a quick way to get it done.
When working on multiple similar rooms, the copy function allows applying the same settings from one Room Light Control to another. This avoids manual entry and ensures consistent operation across rooms.
Step by Step Example
Let's wrap up with a quick example of how to configure it from the web interface.
Here's an example of how to configure a Room Light Control:
Go to the Room Light Control section of the web interface.
Open the configuration of a Room Light Control.
Set a name and enable it.
Under Occupancy, choose the Occupied Command. For example, set it to Recall Max Level.
For Unoccupied, set the command to Off.
Optionally, add a Warning Command to reduce lights to 20% and set a warning time of 30 seconds.
Configure the Override Time, for example 10 minutes.
Enable Daylight Harvesting, define a setpoint of 500 lux, set the deadband and step size.
Assign occupancy and light sensors.
Assign the output group or channel that the Room Light Control will control.
Save your changes, and test using the Test Mode.
Conclusion
Room Light Control provides a smart and flexible way to automate lighting across different areas. With the right configuration, it helps improve comfort and energy efficiency.